How do I calibrate a new UAV camera and lens?
The procedure is slightly different to a terrestrial camera, you first need to find the optimal aperture setting for the drone camera.
For normal aerial or oblique projects, it is best to plan the imagery so that adjacent images have 80% overlaps on the same strip and at least 30% side overlap between multiple strips in a block arrangement. This can be planned using the Object Distance spreadsheet to determine how many strips of photos are required for a given accuracy.
Included below is some background information to help determine the optimal camera settings to use:
Aperture
The first step is to take some images of an unrendered area of a brick wall standing approximately 1 metre away to determine the best aperture setting. For aerial work it’s worth experimenting to find out what the largest usable aperture is to reduce the exposure time. This will minimise motion blur in the images.
The best way to determine the maximum aperture to use for a given lens is to capture a series of images of a brick wall at different aperture settings and check the corners of the image at 1:1 zoom for blurriness:
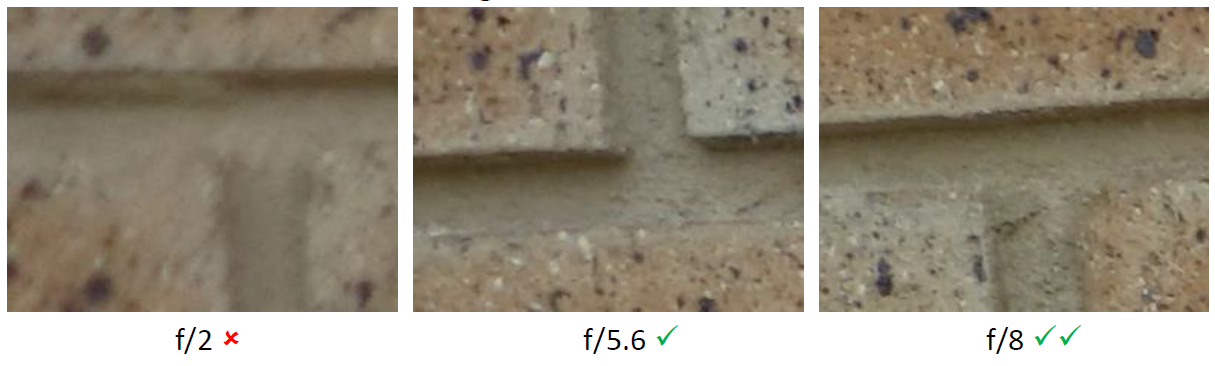
For this lens, f/5.6 could be used if the shutter speed cannot otherwise be made high enough, but f/8 is better (and f/7.1 (not shown) is a good compromise). f/2 is unacceptable. (Sharpness progressively improves from f/2→f/8, there isn’t really a hard boundary between “good” and “bad”.)
Focus
It is generally recommended to use autofocus before each flight, focussing on a distant object (e.g. mountains, pit wall etc.), then switch to manual focus before take-off. The focus can still change due to vibration so it’s a good idea to refocus before every flight.
Exposure
When the camera is set to an automatic mode, or a semi-automatic mode (like Aperture Priority), it changes settings automatically to ensure the image is correctly exposed in terms of its brightness.
Please ensure the camera settings are set up correctly prior to taking any calibration images:
Set aperture mode to Aperture Priority Av.
Select the optimal aperture setting derived from brick wall photography mentioned previously.
Set ISO to 100 if conditions are usually bright and sunny. You can change this to ISO 200 if conditions are overcast.
Set White Balance as AWB (Auto White Balance).
Set focus type in the lens as AF (Auto Focus) and focus on a distant object. Switch back to MF (Manual Focus) when taking photos.
Set Metering mode as Evaluate Metering.
Set Auto Image Rotation OFF.
Set image quality as fine, using .JPG format and ensure you use the maximum image resolution of the camera by checking the actual pixel values.
Calibration Imagery
Flying over an area which contains different and varying depths in the scene is ideal for the camera calibration (e.g. stockpiles on a pad or covering a few benches on a pit wall). If control is being used, it is best to set out 4 control points around the perimeter corners of the area and an additional 2 to 3 control points located along the centre line of the calibration area. Aim to have some of the control points placed at different Z (or RL) depths rather than all being on the same plane (e.g. control points at both bottom and top of the pit).
Fly three strips for the calibration photography making sure that the camera positions are distributed in all three dimensions, like the project below; only the middle strip would actually required to captured the pit wall, but by putting a second strip vertically above the middle one, and a third strip horizontally next to the middle one, we end up with camera positions in all three dimensions:

For each strip, aim for the following overlaps:
80% adjacent overlap between each successive image on the same strip.
50% side overlap between strips.
Take at least 12 images per strip.
This configuration will provide a robust solution for the UAV camera calibration.